12 Amazing Albums Playing in the Office.
Posted by: Ty Clark
•
Here are some tunes for your week, from our office to yours! Much love and listening!
At The Office- the office- Echo?

Here are some tunes for your week, from our office to yours! Much love and listening!
At The Office- the office- Echo?
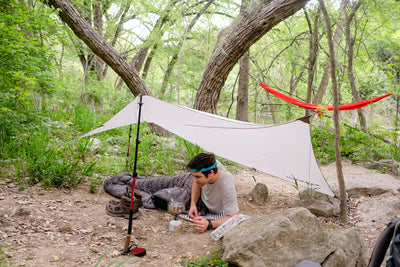
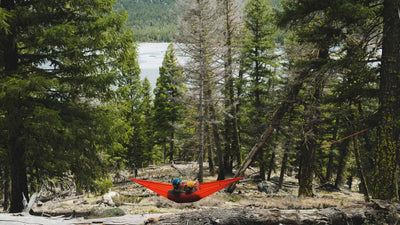
Last year, with everyone self quarantining across the country and all of our favorite parks closed, we kicked off National Camp at Home Day. We loved seeing the creativity you brought to your at-home campsite, and we couldn’t wait to bring the fun back. This year for National Camp at Home Day, as your favorite camping spots slowly begin to reopen and people are starting to travel safely again, we’re focusing on preparedness. Think of National Camp at Home Day as the perfect occasion to pull out all the gear and have a trial run before setting out on the next big adventure. Over the coming weeks, we’re going to lay it out for you: how to choose the right shelter, tips for gear prepping, perfect recipes for the Dutch oven, and everything in between. So hang the hammock, grab some fresh batteries for the headlamp, and settle in: the adventure starts here. If you’ve never been camping before, even the thought of walking into an REI can feel intimidating. With so much jargon tossed around and gear to research, the knowledge needed to make an overnight trip successful can seem overwhelming. It shouldn’t feel this way. Let’s get back to the basics, starting with styles of camping. Basecamp or Backcountry? You can think of Basecamp as the drive-in spot at your favorite national or state park. You’ll usually have the ability to bring more of the comforts of home, like comfy camp furniture and a broader kitchen setup, and you’ll still have access to the beauty of a place like Big Bend or Great Smoky Mountains National Park. If you’re new to camping, this can be an easy introduction into the world of overnights. We recommend considering what your future goals are, and if backcountry camping is something you want to work towards, think about buying gear that can be used for both applications. No matter how you want to kick things off, there’s nothing wrong with starting small and working out the kinks. Basecamp can have awesome benefits like proximity to water and electricity while still being close to beautiful trails worth exploring. Backcountry, on the other hand, means you’ll be packing everything in on your shoulders, so a lot more attention must be paid to the weight of your kit. There are exceptions as well, like bikepacking and river trips, but for now we’re going to stick with these two basic categories. Backcountry camping can seem like another beast entirely, but with practice, it doesn’t have to be. There won’t be room in your pack for luxury items you might take to Basecamp, but the tradeoff is you can find yourself in remote places with spectacular views. Not to mention, the crowds disperse as you get further away from park headquarters. Backcountry camping allows you to cover ground efficiently and do things you may not be able to otherwise, like making a long, multi-day trek or waking up to an epic sunrise in the Tetons. What shelter is right for you? No matter where you plan to lay your head in the woods, you’re going to have to choose a shelter. Each shelter has its advantages, and you’re going to have to weigh the pros and cons and decide what’s right for you and for the environment you’re camping in. First up: Tent camping. If you’re imagining yourself camping, this is probably what comes to mind. Tents offer considerable protection from the elements, are fairly easy to set up, and work virtually everywhere. Some drawbacks to consider are longer setup and teardown times, added weight in your pack in some cases, and their susceptibility to getting dirty inside or wet from condensation. Also keep in mind that finding the perfect tent site in the backcountry, or even while car camping for that matter, isn’t always so simple. You’ll often end up with a rock in your back or on an annoying slope that sends you sliding to one side of the tent all night. Still, it’s hard to beat the dependability of a faithful tent. Next: Hammock camping. No more long setups before sitting down to enjoy a meal, and you can forget about that rock in your back as well. With the addition of rainflies, bug nets, and plenty of insulation, you’ll feel right at home in virtually any conditions. A huge bonus is the level of comfort you’ll enjoy while sleeping in a hammock—the days of crawling out of your sleeping bag with a stiff back are over! There are downsides to consider, the most obvious being the question of where to hang your hammock. Camping in the desert is likely not an option, and although it’s rare, some parks ban the use of hammocks altogether. It’s always best to check for regulations before making any decisions about how you’ll utilize a park. Bottomline, with the right amount of trees, hammock camping is a solid option. For our grand finale: Cowboy camping. Everyone’s dreamed of sleeping under the stars, and with modern sleeping pads and camp quilts, you’ll sleep more comfortably than John Wayne ever thought possible. A key advantage comes into play after a long day on the trail when all you want to do is crawl inside your sleeping bag. Cowboy camping makes setting up camp as simple as possible so you can focus on the fun parts, like stuffing your face with granola bars and hiking until your heels bleed. Another huge plus as more and more of us move into light-polluted cities is the view of the stars without a rainfly or bugnet overhead. Drifting off to sleep with unmatched views of the Milky Way is an experience that’s truly hard to beat. Before we romanticize this too much, consider that cowboy camping leaves you exposed to the elements—bad weather and critters alike. The last thing you want to face in the middle of a deep sleep is a rain-soaked or scorpion-infested sleeping bag. Still, when implemented in appropriate conditions, cowboy camping can be the perfect way to enjoy the outdoors. If you’re still trying to decide what shelter is right for you, or even if you’re a longtime camper curious about a new setup, National Camp at Home Day is the perfect opportunity for a trial run. In the field, you want to be as familiar as possible with your gear to make setting up camp a breeze. Practice pitching camp at home so when the weather turns south and the wind and rains come, you’re able to get out of the elements and into your warm sleeping bag as quickly as possible. To learn more about hammock camping, check out these two blogs: Four reasons to make Mantis your go-to sleep system Hammock Camping 101
At Kammok, we’re on a mission to elevate time outside because we believe in the transformative power of outdoor experiences. Time outside allows us to breathe a little deeper and rest a bit longer. The relationships we build here are strong — meaningful connections forged by adventure. Our view of the wild world is changed, and we’re inspired to steward it well. Self care, community care, and planet care—these are the elements we want to encourage by elevating time outside. “Time outside brings out the best in us, and we are on a mission to bring out the best in people.” Greg McEvilly, Founder & CEO - Kammok As we celebrate our 10 year aniversery, we reflect on why we started this journey in the first place. And we are asking ourselves if we’re still on the right path. In the process we came across this statement from our first ever Kickstarter. “The heartbeat of the KAMMOK™ brand is to equip and inspire for Life Changing Adventure™. Our products are intended to take the user to incredible new places while connecting them with a bigger mission. We hope to be a conduit that helps create a culture of people that are passionate about changing the lives of others who are in need, and being good stewards of our resources.” 10 years later, the mission hasn’t changed. There’s a simplicity outside. You don’t need to walk a hundred miles to feel the benefits of warm sunshine or to gaze in awe at the brilliance of the night sky. Say yes to a spontaneous two-mile run in a sudden downpour or the invite from your friends to catch the sunrise and a cup of coffee before work. Build a fire in your backyard, read a book in the park, or splash along with your dog through your favorite swimming hole. There’s prosperity out there, waiting for you to find it. All you have to do is go. A new series of apparel To celebrate the simple moments outside that we love so dearly, we’re launching our new Elevate Time Outside line of apparel. The first in the series is the Rock Skipping Champion, designed for lovers of the perfectly flat rock. There’s a rock skipper in every bunch, whether you know it or not. Celebrate the simple moments that create lasting memories They’re the ones who always find a way to turn something into a game and keep everyone entertained. It’s the same person you’ll find with a deck of cards in their pack, and probably a lighter as well (they always volunteer to get the fire started). Crown your Rock Skipping Champion today with the perfect prize.
Alisha McDarris is the co-founder and writer at terradrift.com, a sustainable travel and outdoor adventure blog and YouTube channel where gear reviews, how-tos, and guides help folks get outside to play more and do so safely, responsibly, and sustainably. There’s little more thrilling than outfitting yourself with a few new pieces of gear. The excitement! The thrill! The compelling urge to get outside to use it as soon as humanly possible! But constantly buying brand-new gear is hard on the environment. Virgin materials, resource-intensive manufacturing processes, and harsh chemical dyes all contribute to harmful greenhouse gasses, and often, the well-loved gear we just replaced gets tossed in a landfill where it could take hundreds of years—if not longer—to break down. But there is a solution: used gear. Buying used instead of new is good for the planet, good for our wallet, and good for overflowing landfills. And it’s still just as exciting. It’s new to you, after all. So if you want to make your camping setup more sustainable, consider buying used instead of new. Here’s how (and where). Where to find used gear If you’re not sure where to start when it comes to used gear, don’t sweat it; there are plenty of places to find it online or in person. Start by checking at a local gear shop if you’re lucky enough to have one near you. Many local shops have used or consignment sections. Some cities even have stores dedicated entirely to used gear. If there’s not a used gear shop where you live, keep an eye out for sample sales. Kammok isn’t the only brand that hosts them as a way to offer solid used gear at a discounted rate! Next, check larger retailers like REI. The stores host several Garage Sale events per year that offer returned and used gear at deeply discounted rates. During COVID, most stores still place Garage Sale items around retail locations so savvy customers can still find a good deal. You do have to be an REI Co-op member to shop Garage Sale items, though, so keep that in mind. Online is a great place to look for used gear too. REI has a used gear section, as do many outdoor brands like Patagonia, Arc’teryx, and The North Face. Another favorite is GearTrade.com, which is all used outdoor gear all the time. You may even find items with the tags still on! Lastly, it never hurts to check sites like Ebay, Amazon Warehouse, Craigslist, or Facebook Marketplace. You can often find used outdoor gear in your own neighborhood. How to score the best used gear Of course, not all used gear is quality used gear. There’ll be plenty of used and abused, weathered and battered gear out there, but there’s also plenty of gear that’s barely been touched. On online listings, look for wear ratings like good, fair, or excellent. Then check for details on what’s wrong with it if it’s not in great condition. Sometimes a pair of boots may have been worn thin. Other times, all that’s wrong with a tent is that it has a small puncture hole in the floor (more on repairing used gear below). Make sure the item you’re considering suits your purposes, then buy with confidence. If you’re shopping locally, either from a retailer or individual, don’t be afraid to ask to unpack a sleeping bag, set up a tent, try on a jacket, or inflate a sleeping pad. Make sure it’s in as good of shape as the seller claims before you buy. Check for warranties Many quality outdoor gear brands and manufacturers offer excellent warranties with their gear. Osprey, for example, offers their All Mighty Guarantee on everything they make (whether or not you bought it used), and Kammok gear comes with a lifetime warranty too, which even backs their used gear! So check which manufacturers offer lifetime warranties and find out if that warranty extends to a second owner or used gear sold directly from the manufacturer. Then, if it needs repairs, find out what it takes to ship it in and get it fixed up like new. Repair worn or used gear Finally, if you found an amazing piece of gear for a stellar price, but it has a small tear, defect, broken buckle, or the like, don’t shut it down just yet. Most gear can be repaired, and often, all that’s required is a wash, re-waterproofing, patch job or zipper lubrication. Learn how to perform basic maintenance on your gear and you’ll not only be able to keep it in use longer, you’ll be able to score great deals on slightly defective gear as most people won’t bother repairing it. For example, I scored at least half off an expensive Big Agnes tent that was probably used once at an REI Garage Sale because it had a small tear in the floor. I took it home, patched it in two minutes, and the tent is just like new. Sell your old gear Now that you’ve replaced a few items in your gear closet with quality used camping gear, don’t forget about your old gear! If it’s still in decent or better working order, clean it up and resell it! Use sites like Craignslist or Marketplace or gear-specific sites like GearTrade.com. REI also lets members sell their used gear on REI.com now! If it’s time to retire an item permanently (say, if a tent is falling apart at the seams, or a sleeping bag is so old it’s lost all of its loft), take a minute before tossing in the garbage can. Many materials, buckles, and accessories can be removed and reused on other repair or DIY projects. And some repair shops and universities may even take the old gear for certain specialized programs. It’s always worth it to check as most plastic and synthetic materials won’t break down in landfills. Bottom line Used gear is more sustainable than the shiniest new eco-friendly gear. So if it’s sustainable camping you want, it’s out with the new and in with the old! Fill that gear closet with quality used items and feel good about reducing your footprint, being kind to the planet, and saving yourself a few bucks in the process.

The past few weeks have been filled with discussion, both internally as a company and as nine individuals in pursuit of social justice. At Kammok, we exist to promote human flourishing through adventure outside, but people cannot flourish when racism is putting lives in danger every day. We believe community is transformative to create lasting change, and we all need to address the racial divide in this country. We champion love as our chief core value, and staying silent about systematic injustice is not loving. As an ally to the Black community, people of color, and underrepresented voices in the outdoors, we are committed to fighting for justice, and to acting on what is right. Immediately, we are donating to nonprofits, matching employee donations up to $2K to organizations fighting against injustice, inequality, and racism. This isn’t a one-time donation. As part of our ongoing commitment to give 1% of revenue to social and environmental initiatives, we are identifying organizations that build inclusivity and equity in the outdoors so that Kammok can invest and enable them long-term. We've supported Explore Austin since 2017 to empower youth through outdoor mentorship, and we will continue to support as we expand our scope for giving. We have a platform, and eyes and ears from a receptive community that shares our mission to elevate time outside for all people. We ask our Kammok community to reflect on the impacts you can make. These are our first of many steps to hold us accountable for the change we wish to see. It's on us to work towards change together. Greg McEvilly CEO/Founder and Team Kammok
