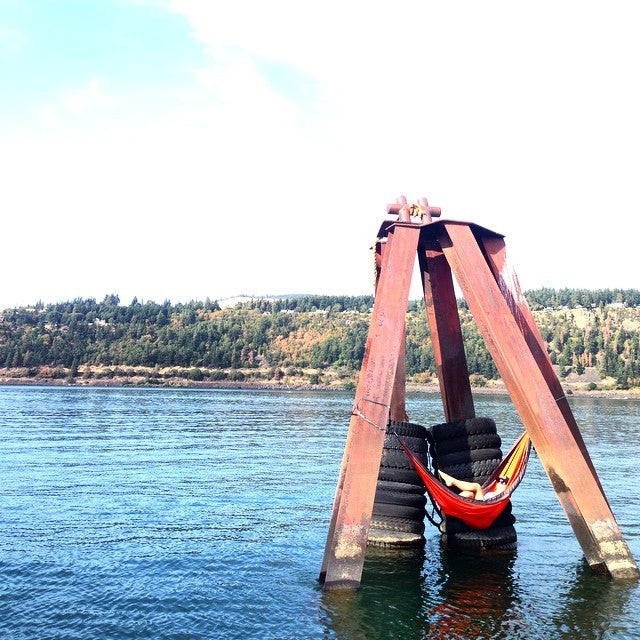
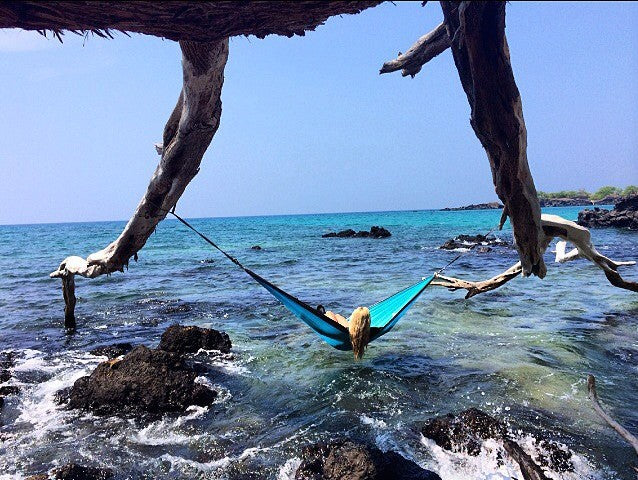
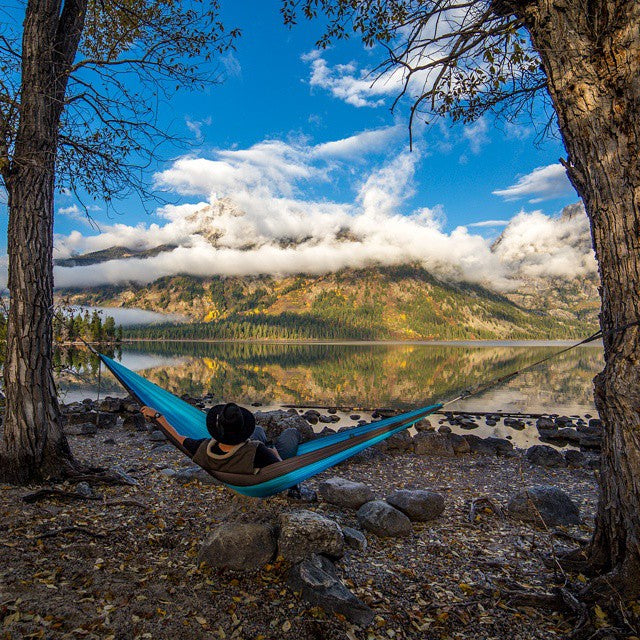
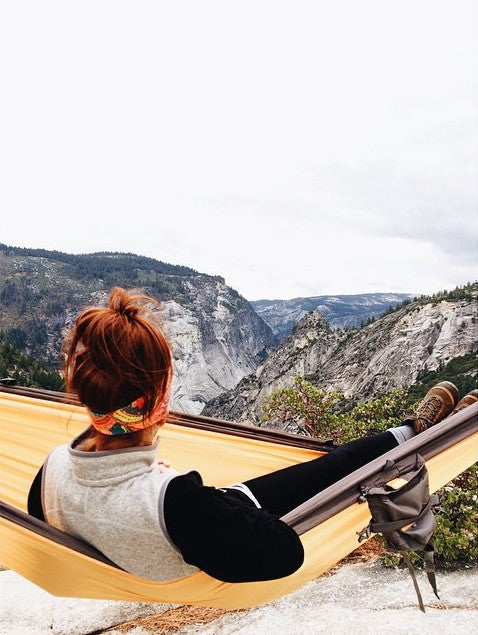
Best of #theroolife Sept 22-28th
Posted by: Ty Clark
•
Here a few amazing images from our hashtag #theroolife.
Make sure you are tagging your Instagram images so that we can repost them from our page!


Here a few amazing images from our hashtag #theroolife.
Make sure you are tagging your Instagram images so that we can repost them from our page!
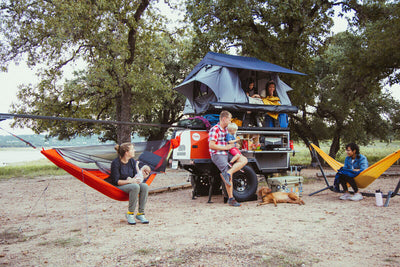
The ultimate hammock basecamp We teamed up with TAXA Outdoors to put a Kammok spin on their Woolly Bear habitat. The result is a go-anywhere, do-it-all trailer that's ready for any hammock adventure. We could all use a little more time outside, and the Kammok Edition Woolly Bear is the perfect tool for getting out and staying out. The Camp Chef's Dream Kitchen One of the biggest barriers to getting outside is the comfort you leave behind at home, one of the most crucial being a fully functioning kitchen with everything you need at your fingertips. The Woolly Bear kitchen offers the best of both worlds, with clever organization, plenty of workspace, and the ideal outdoor setting. Now you can get outside with confidence and cook to your heart's content. A Gear Closet on Wheels The Kammok Edition Woolly Bear has a place for all your camping essentials. No more packing and repacking: Load up once, and you're always ready for the next outing. Introducing the Outpost We knew a Kammok Edition Woolly Bear wouldn't be complete without a robust, full-size hammock setup. The Outpost easily attaches to the cargo deck of any Woolly Bear and allows you to hang a full-size hammock in virtually any setting. The Outpost's lightweight frame make it a cinch for anyone to deploy, and the tool-free setup means it's ready to go with the press of a button. Adjustable legs and a 360 degree swivel mount allow you to hang your hammock on any landscape, from smooth blacktop to the roughest backcountry campsites. Create the ultimate hammock basecamp by attaching up to six Outpost hammock stands to your Woolly Bear. With the addition of a rooftop tent, your Woolly Bear can comfortably sleep up to nine happy campers. Arriving Spring '22: Outpost 2.0 will allow for attachment to your vehicle's roof rack or a single tree.
At Kammok, we’re on a mission to elevate time outside because we believe in the transformative power of outdoor experiences. Time outside allows us to breathe a little deeper and rest a bit longer. The relationships we build here are strong — meaningful connections forged by adventure. Our view of the wild world is changed, and we’re inspired to steward it well. Self care, community care, and planet care—these are the elements we want to encourage by elevating time outside. “Time outside brings out the best in us, and we are on a mission to bring out the best in people.” Greg McEvilly, Founder & CEO - Kammok As we celebrate our 10 year aniversery, we reflect on why we started this journey in the first place. And we are asking ourselves if we’re still on the right path. In the process we came across this statement from our first ever Kickstarter. “The heartbeat of the KAMMOK™ brand is to equip and inspire for Life Changing Adventure™. Our products are intended to take the user to incredible new places while connecting them with a bigger mission. We hope to be a conduit that helps create a culture of people that are passionate about changing the lives of others who are in need, and being good stewards of our resources.” 10 years later, the mission hasn’t changed. There’s a simplicity outside. You don’t need to walk a hundred miles to feel the benefits of warm sunshine or to gaze in awe at the brilliance of the night sky. Say yes to a spontaneous two-mile run in a sudden downpour or the invite from your friends to catch the sunrise and a cup of coffee before work. Build a fire in your backyard, read a book in the park, or splash along with your dog through your favorite swimming hole. There’s prosperity out there, waiting for you to find it. All you have to do is go. A new series of apparel To celebrate the simple moments outside that we love so dearly, we’re launching our new Elevate Time Outside line of apparel. The first in the series is the Rock Skipping Champion, designed for lovers of the perfectly flat rock. There’s a rock skipper in every bunch, whether you know it or not. Celebrate the simple moments that create lasting memories They’re the ones who always find a way to turn something into a game and keep everyone entertained. It’s the same person you’ll find with a deck of cards in their pack, and probably a lighter as well (they always volunteer to get the fire started). Crown your Rock Skipping Champion today with the perfect prize.
By Luisa Vargas The weather in Austin has been less than ideal (by Texan standards). We’ve seen more rain these past few weeks than we do all year, and Thursday was the hundredth consecutive day of thunderstorms. Or at least if felt that way! The result of constant rainfall at the Barton Creek Greenbelt trail in Austin, TX. Wednesday night, our team decided to hold off on doing Taco Tri as the thunderstorms were getting pretty bad. It turns out all it did was rain that day. But the fun part about a virtual Taco Tri is that even though we didn’t get to participate in Austin, people all over the world did. Photo of Seth Tullar (right) in Australia. This month was particularly exciting because our friends in Australia participated! This is one the furthest away someone has been whose taken part in Taco Tri. Thank you, Seth, for tri-ing with us! We hope the weather was better “down under." Abelardo was runner up in the competition taking part in the tri in Alaska! We hope next month we’ll be able to Taco Tri again in Austin and can’t wait to see what other exciting places people will participate on July 1st!
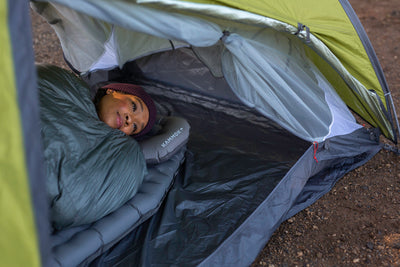
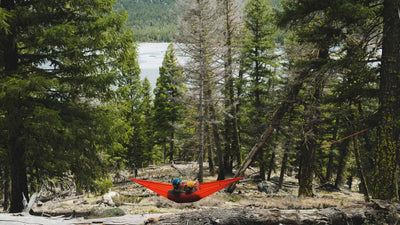
It’s that beautiful time of year again where sunny days and crisp spring air are inviting us outside. Here in Austin the wild flowers are blooming, and the creeks are filling with fresh rain—hopefully enough to keep the limestone falls sustained through the summer. Christian, our teammate up in Denver, just marked the coming of spring by waxing his skis and putting them away, trading them in for a pair of hiking boots he’ll be tackling some fourteeners with on the weekends. We hope you’re taking note of similar changes wherever you are, maybe the snow melting in the mountains, clearing the way for your next summit or filling the rivers for your next white water trip. Whatever the case, it’s time to start making those campsite reservations and packing up for the next adventure. Photo by @MoonMountainMan. Swiftlet & Roo Single No car camping site is complete without a comfortable place for an afternoon siesta, and we all know that means bringing a hammock along. If you’re going to a beach or desert campsite, the Swiftlet is the perfect solution for a treeless hang. Even in a pine forest, finding the two perfect trees for your hammock isn’t always easy. A Swiftlet combined with a Roo Single gives you the versatility you need to hang anywhere. Use the short bar for chair mode at the picnic table, and then switch to the long bar for lounge mode and a post-lunch nap. At night, you’ll be able to hang by the campfire or lay back and star gaze if the conditions are right. Shop our Memorial Day Sale for 20% off Roo Singles! Mantis One of the most convenient shelters you’ll ever pack is the Mantis all-in-one hammock. Ditch the bulky ground tent and opt for the minimalist camping approach. The Mantis is perfect for spring with a breathable body that allows you to enjoy the breeze while also sporting a built-in bug net to keep out pesky insects. If rain or high wind is in the forecast, the rain fly will make sure you stay out of the elements. Clear skies ahead? Keep the fly in the stuff sack, take in the view, and fall asleep under the stars. The Mantis’ ease of setup and all-in-one design make it the perfect choice for new hammock campers and experts alike. Now through May 31, get a free Ridgeline Organizer when you purchase a Mantis—the perfect place to stow your water bottle, headlamp, and other essentials you want easy access to. Firebelly 30 Trail Quilt This may be the most fought-over item at your campsite. The Firebelly is made with buttery-soft fabric that is just as durable as it is snuggly. Poncho mode makes it perfect for wearing around camp, and just like the name suggests, you’ll stay warm with or without a blazing campfire.The Firebelly is also adaptable to any condition: Use it as a top quilt in warmer conditions or as a minimalist sleeping bag on those especially chilly nights. If you’re hammock camping, the Firebelly 30 can be used as an underquilt as well, ensuring a warm night no matter what. This trail quilt might exchange hands quite a few times at camp, but if your name’s on the tag, you’re the one that gets to take it into your tent at night—lucky you. Insulated Pongo Pad and Puffin Pillow Camping has a bad reputation for leading to rather uncomfortable sleeping. From day one here at Kammok, we’ve been designing products with the aim of changing this misconception, and our Insulated Pongo Pad and Puffin Pillow are no exception. No matter your preferred shelter, the comfort that this dynamic duo provides is unparalleled. The Pongo offers three-season support, with insulation for those colder nights and warm weather comfort as well. Add the Puffin to your kit, and you have a velvety-soft pillow that you can inflate to your liking. And you won’t believe what these two will do for your hammock game. Both the Insulated Pongo Pad and the Puffin Pillow fully integrate with our hammocks for a bed like no other. The comfort level is so high that you may prefer it to your plush pillow-top mattress at home. During our Memorial Day Sale, get 25% off our Spring Camp Kit that includes the Pongo, Puffin, and a Firebelly 30 for the ultimate sleep combo. A Frisbee and a Deck of Cards Camping lends itself to lots of down time—slow afternoons spent enjoying nature with your friends. That's why we love it! A frisbee is easy to pack and makes for a fun activity that everyone can be a part of. A Kammok fan reached out to say they always bring a frisbee to camp and pointed out that they can never go flat (major bonus points, especially where there's an abundance of cacti). We love having a frisbee on long road trips when all you want is to stretch your legs and get a break from driving. Similarly, a deck if cards is lightweight and takes up minimal space, but the payoff is huge. We love Uno, but a standard deck is great for all sorts of games. Personal favorites of ours are Spades, Euchre, and Tiến lên, or Vietnamese cards. Cards are great for rainy nights in the tent or around the table after dinner, and if you always have a deck in your pocket, you're always ready for a game. Hopefully all this talk of camping has gotten you jazzed for the next adventure. Now seriously: Head over to your favorite park’s reservation site and plan your trip.
